Still converting leads in Salesforce by hand? That’s the old way of doing things, where someone on your sales or marketing team has to manually turn a Lead record into an Account, a Contact, and hopefully, an Opportunity.
Frankly, this approach is slow, expensive, and it’s killing your ability to connect with high-intent prospects the moment they're ready to talk.
Why Manual Lead Conversion Is Costing You Deals
If you feel like your sales funnel has a leak, you might be right. The culprit is often a clunky, manual Salesforce lead conversion process.
Think about it. Every single minute that ticks by after a prospect requests a demo is a minute they could be going cold, checking out your competitor, or just losing interest entirely. This isn't just an annoying administrative task; it's a direct hit to your bottom line.
The real problem is the handoff. A lead comes in, then it waits to be manually qualified, then it waits again to be assigned, and then it finally gets converted. There are so many places this can go wrong. A sales manager is stuck in a meeting and can't assign it. A rep misses the notification. All this friction gives your competition the perfect opening to swoop in.
The True Cost of Delay
The lag time from manual processes isn't just an inconvenience—it has a very real financial impact. These are the kinds of problems we see all the time with teams that haven't automated this workflow:
- Your Data Gets Messy: When reps are manually creating Accounts and Contacts, mistakes happen. Typos, inconsistent formatting, forgetting to map important fields... it all pollutes your CRM. Good luck getting reliable reports or building clean segments with bad data.
- Response Times Suffer: That hot lead from your website? They could be waiting hours for someone to get back to them. We all know the stats—responding within the first five minutes can be the difference between qualifying a lead and losing them forever. You just can't hit that speed with a manual process.
- You Kill the Momentum: The prospect is excited right now. When they have to wait for an email back and forth just to book a time, all that energy fizzles out. They’ve raised their hand to talk, and your manual process is essentially telling them to take a number and wait.
The biggest risk of a slow Salesforce lead conversion workflow is that you're forcing prospects onto your timeline, not theirs. When someone is ready to buy, any delay is working against you.
From Bottleneck to High-Velocity Pipeline
The best sales teams have already figured this out. They've moved way beyond these manual workflows because they know that the moment a lead qualifies is a critical trigger.
Instead of waiting for a person to click the "Convert" button, they use automation to instantly connect that qualified lead with the right rep. If you want to dive deeper into how that works, understanding the different strategies for leads routing in Salesforce is a great place to start.
By automating Salesforce lead conversion, you take what was once a frustrating bottleneck and turn it into a high-velocity pipeline. This simple shift ensures every single high-intent lead gets an immediate, professional response, massively increasing your chances of booking that first meeting and closing the deal.
Preparing Your Salesforce for Automation Success
Before you even think about building your first automation, you’ve got to get your house in order. Jumping straight into complex workflows without a clean, well-defined Salesforce environment is just asking for trouble.
Think of it like building a house. You wouldn’t start putting up walls without a solid foundation, right? The same logic applies here. Taking the time to prep your instance now will save you a world of headaches later.
Your first job is to get your sales and marketing teams in a room (virtual or otherwise) and hammer out your lead qualification criteria. You need to agree on the exact, non-negotiable definitions of a Marketing Qualified Lead (MQL) and a Sales Qualified Lead (SQL).
If those definitions are fuzzy, your automation will be, too. You’ll end up sending garbage leads to your sales team and wasting everyone’s time.
Define Your Qualification Triggers
So, what specific actions or data points tell you a lead is truly ready for sales? Vague ideas won’t cut it for a machine. You need concrete rules the system can follow without fail.
Most teams I’ve worked with build their criteria around a few key areas:
- Demographic Fit: Does their company size, industry, or job title line up with your ideal customer profile?
- Behavioral Signals: Did they do something that signals intent, like requesting a demo, binge-watching a webinar, or lurking on your pricing page?
- Data Completeness: Do you have the basics, like a valid business email and a real phone number?
This process is also the perfect excuse to audit your data. Let’s be honest—dirty data is the silent killer of all automation projects. A quick audit will almost always uncover duplicate records, funky field formats, and missing info that will trip up your workflows before they even get started.
Before going any further, make sure you have a strong grasp of foundational CRM and lead generation strategies; they’re the bedrock for any successful Salesforce automation.
Set Up Your Custom Fields
Once you’ve settled on your criteria, you need a place to actually track this stuff in Salesforce. This usually means creating a few custom fields on the Lead object to act as the brains of your operation.
For instance, you could create a "Lead Grade" field that scores demographic fit or a "Behavior Score" that ticks up with every marketing touchpoint. These custom fields become the triggers that kick off your entire automated Salesforce lead conversion and meeting booking machine.
If you want to dig deeper into the nuts and bolts, we've got a whole guide on converting leads in Salesforce the right way.
The goal is to make qualification objective and system-driven. A sales rep shouldn't have to guess if a lead is good. The data in Salesforce should give them a definitive answer.
Ultimately, all this prep work has a direct line to your sales conversion rates. This metric—the percentage of leads that become customers—is everything. A conversion rate of 27%, for example, means 27 out of every 100 leads turn into closed-won deals.
High-quality pipelines, built on clear MQL and SQL definitions, often see conversion rates double compared to unfiltered lists. Why? Because you're filtering out the noise—the leads with bad data, no budget, or no real buying authority—from the very start.
Building Your Instant Booking and Conversion Workflow
Okay, you've cleaned up your Salesforce instance and your qualification rules are dialed in. Now for the fun part: building the engine that powers your instant booking machine.
This is where we'll stitch together the logic of Salesforce Flow with a speedy scheduling tool like Distro. The goal is to create a totally seamless Salesforce lead conversion experience that fires the second a lead is ready.
Think about it: a lead hits your SQL criteria, automatically converts to a contact, and immediately gets a booking link for the right sales rep. This one fluid motion completely eliminates that awkward handoff delay and lets you capture a prospect's interest when it’s highest.
Automating the Conversion with Salesforce Flow
Salesforce Flow is going to be your best friend here. We'll set up a record-triggered flow that kicks off the moment a Lead record gets updated to match your SQL definition. For example, your trigger might be a "Lead Status" changing to "SQL" combined with a "Behavior Score" that just ticked over 100.
Once that flow fires, its main job is to run the "Convert Lead" action. This is where you tell Salesforce exactly how to move the lead's information over to new records.
The image below lays out the mental model for this—a systematic way to map your lead fields to make sure all your data stays intact when the conversion happens.
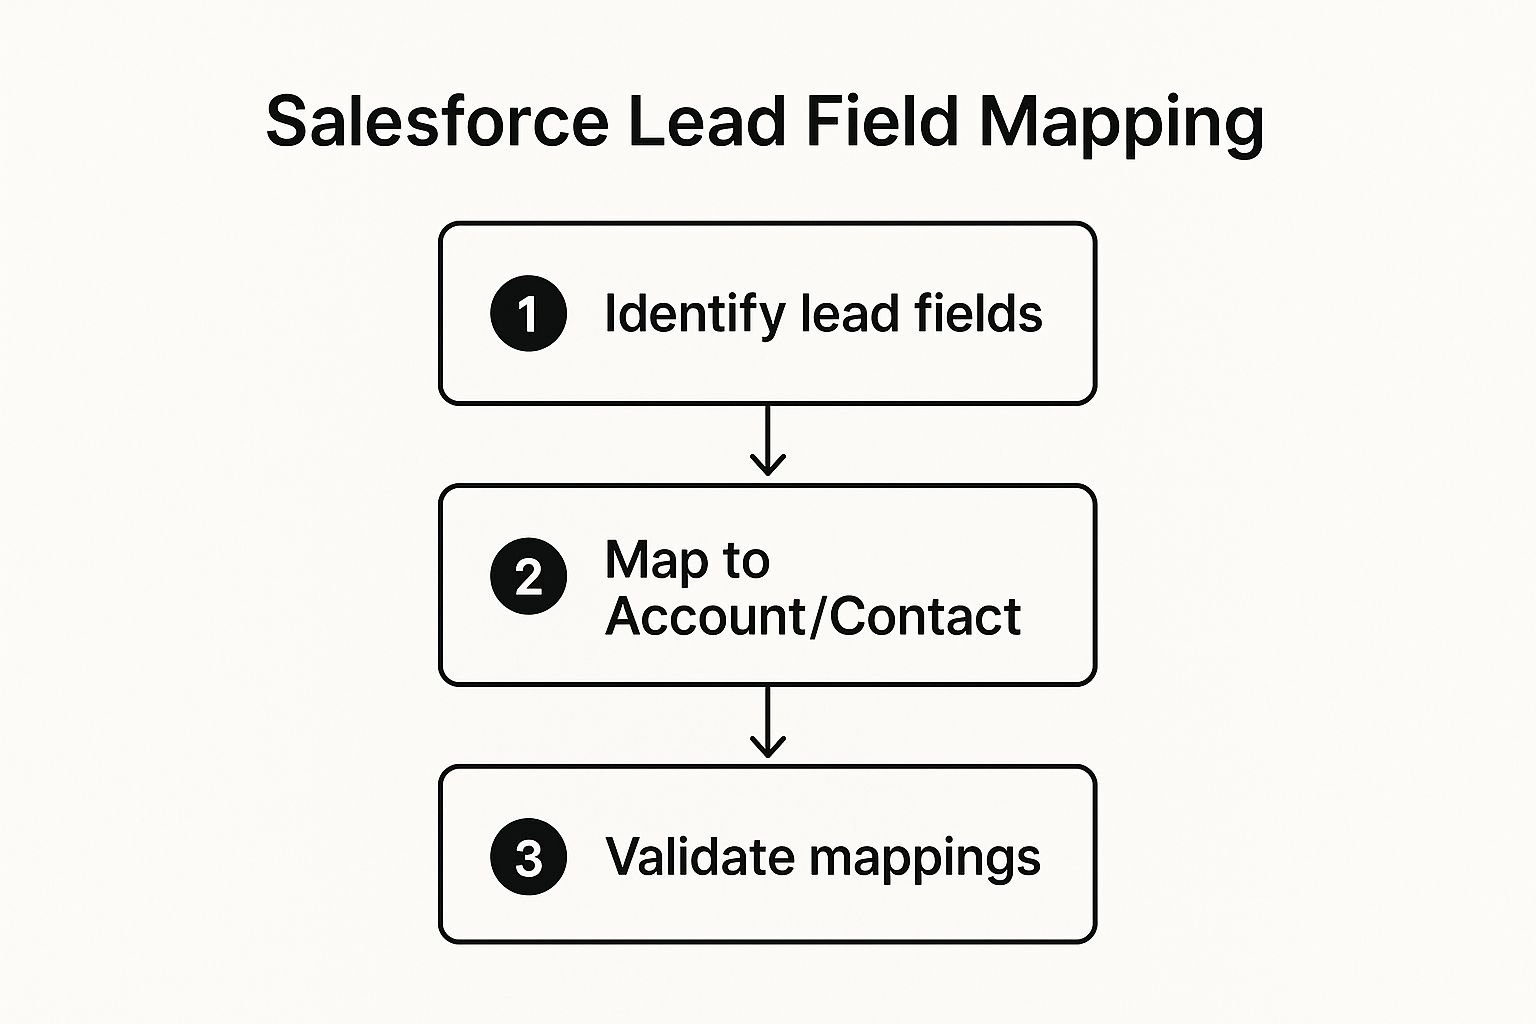
As you can see, being disciplined about identifying, mapping, and validating your fields is what makes or breaks an automated workflow like this.
Mastering Your Field Mapping
I can't stress this enough: field mapping is the most critical piece of this puzzle. Get it wrong, and you risk losing valuable data your sales team depends on every single day. When a lead converts, Salesforce needs to know precisely which Lead fields should populate the fields on the shiny new Account, Contact, and (hopefully) Opportunity records.
The good news is that Salesforce is built for this. Properly mapped fields—both standard and custom—get transferred automatically, which is a massive help for keeping your database clean. When done right, this process drastically cuts down on duplicate records, a problem that can torpedo sales efficiency by as much as 20%.
In fact, organizations that automate this process often convert leads up to 30% faster than teams still doing it by hand. You can read more about winning with Salesforce lead conversion on grazitti.com.
Pay close attention to your custom fields. For instance, you’ll want to be absolutely sure your custom "Product Interest" field on the Lead object maps directly to a matching "Product Interest" field on the new Opportunity.
Pro Tip: Don't forget to map over the Lead Source! This is one of the most important fields for marketing ROI reporting, and it’s surprisingly easy to overlook when you're setting up the automation.
Connecting Conversion to Instant Booking
With the lead successfully converted, the final piece is triggering the meeting booking. This is where an integration with a tool like Distro is essential. You can configure your Salesforce Flow to push the new Contact’s information to Distro using an outbound message or an API call.
Here’s a breakdown of how that connection usually works:
- Trigger Routing Logic: Distro gets the new contact data from Salesforce.
- Assign the Right Rep: It runs your pre-set routing rules (like round-robin, territory-based, or account-based) to pick the perfect sales rep.
- Send the Booking Link: The system instantly fires off an email to the prospect with that rep’s personal calendar link, letting them book a meeting on the spot.
The entire sequence—from a lead hitting your SQL criteria to a meeting popping up on a rep's calendar—can happen in a matter of seconds. All without a single person having to lift a finger.
Right, so you've managed to book the meeting. That's a huge win in your Salesforce lead conversion process, but let's be honest, the job is far from over. I've seen it a hundred times: a massive gap exists between the moment a prospect books a demo and when they actually show up.
This is where your post-conversion engagement strategy becomes absolutely critical. If you just leave this window to chance, you're practically inviting no-shows and letting all that hard-earned momentum fizzle out.
Instead, you need to use automation to nurture that new relationship. The idea is to build anticipation and ensure your sales rep walks into a productive, warm conversation, not a cold interrogation. You have to keep the prospect engaged and demonstrate your value before the call even begins.
Nurturing Leads After They Book a Meeting
That crucial time between the booking and the actual meeting is your opportunity to set the stage. Automated, personalized reminder emails are your first line of defense against no-shows, but they can do so much more than just ping someone about a date and time.
Your communication flow should be designed to deliver real value upfront. Forget the simple calendar invite; think about a short, strategic sequence that builds trust and gets them excited to talk to you.
Here’s a simple but effective flow I’ve seen work wonders:
- Immediate Confirmation: As soon as they book, fire off an email that confirms all the details. But also, introduce the sales rep they'll be meeting (a friendly headshot goes a long way) and lay out a clear agenda. This simple, professional touch immediately builds confidence.
- Valuable Pre-Meeting Content: A day or so before the meeting, send over something genuinely useful. This could be a relevant case study, a short video explaining a key concept, or a blog post that hits on a common pain point. This simple act positions your rep as an expert who's there to help, not just sell.
- Final Reminder: An hour before the call, send one last reminder. Make the meeting link impossible to miss and briefly reiterate the value they’re going to get from the conversation.
The best post-conversion strategies don't just remind; they prepare. When you provide useful content beforehand, you transform a potentially cold call into a warm, informed discussion. The difference in meeting outcomes is night and day.
Tracking Engagement Inside Salesforce
So, how do you know if any of this is actually working? You track everything, of course.
By integrating your email automation tool with Salesforce, you can log every open and every click directly on the Contact or Opportunity record. This is absolute gold for your sales reps.
Before they even hop on the call, they can see if the prospect opened the confirmation email, clicked through to the case study, or watched that video you sent. This context is invaluable, allowing reps to tailor their conversation to what the prospect has already shown interest in.
We all know speed-to-lead is king, but post-conversion responsiveness is just as vital. Research shows that companies responding to leads within an hour are about seven times more likely to have a meaningful conversation. This principle doesn't stop once the meeting is booked. A smart, multi-touch approach that keeps the conversation going is what separates the top performers from the rest.
Using Salesforce to manage this entire journey allows you to capitalize on that initial spark of interest and guarantee a smooth, informed sales process from start to finish. You can dig deeper into how responsiveness impacts lead management on slack.com for more on this.
The difference between a manual, reactive follow-up process and an automated, proactive one is stark. Let's break down the real-world impact.
Manual vs Automated Lead Response Impact
| Metric | Manual Lead Response | Automated Instant Response |
|---|---|---|
| Speed to Lead | Hours or days | < 5 minutes |
| Contact Rate | Low | High (up to 9x higher) |
| No-Show Rate | High (20-40%) | Low (<15%) |
| Rep Productivity | Wasted time on manual tasks | Focused on high-value conversations |
| Lead Experience | Inconsistent & frustrating | Smooth, professional, engaging |
As you can see, the data speaks for itself. Automating your follow-up isn't just about efficiency; it's about fundamentally improving the odds of turning that booked meeting into a closed deal. You create a better experience for the buyer and give your sales team the context they need to win.
An automated system is only as good as the results it delivers. Just flipping the switch on your Salesforce lead conversion workflow isn't the finish line. You have to actively monitor its performance to make sure it’s actually speeding up your pipeline and not just shuffling leads around faster than before.
This means building out specific reports and dashboards in Salesforce to keep a close eye on your automation's health. Without that oversight, you're flying blind. I've seen small issues quietly snowball into major pipeline leaks, completely undermining the efficiency you worked so hard to build.
A dedicated dashboard is your best friend here. It gives you a real-time, at-a-glance view of the whole process.
Key Metrics for Your Conversion Dashboard
Your dashboard shouldn't be a data dump. You need to focus on a handful of key performance indicators (KPIs) that tell the full story of that lead-to-meeting journey. These are the metrics that will instantly flag bottlenecks and show you where you can tune things up.
I always recommend starting with these essentials:
- Lead-to-Meeting Time: This is the big one. How many minutes or hours pass between a lead qualifying as an SQL and them actually booking that meeting? The goal here should be single-digit minutes. Seriously.
- Meeting Held Rate: Of all the meetings booked through your new automated flow, what percentage actually happen? A low held rate can be a symptom of bad reminder emails or, more critically, an issue with the quality of leads you're routing.
- Sales Cycle Length: At the end of the day, this is all about closing deals faster. Track the average time from the moment a lead is created to a closed-won opportunity. As your response times get better, this number should start ticking down.
- Conversion Rate by Rep/Territory: Are certain reps or territories converting meetings into opportunities at a higher clip? This data helps you spot your top performers and figure out what they're doing that can be replicated across the team.
If you want to go a level deeper, you can start connecting these metrics to your overall lead-to-sale conversion rate. This is how you tie your automation efforts directly back to revenue.
Troubleshooting Common Automation Pitfalls
Look, no automation is perfect on day one. You’re going to hit a few common bumps as your system starts processing real-world leads. The trick is knowing what to look for so you can fix it fast.
One of the most frequent problems I see is a simple field mapping error. This is when data from a Lead field fails to copy over to the corresponding Contact or Opportunity field during conversion. The result? Reps get half-baked records and lose crucial context. Make it a habit to audit your converted records to ensure fields like "Lead Source" or any custom product interest fields are populating correctly.
A classic sign of trouble is when your routing rules send leads to the wrong person. This often stems from incorrect territory assignments in Salesforce or a misconfiguration in your routing logic, like a typo in a state name.
When routing goes sideways, here’s a pro tip: create a test lead that perfectly matches the criteria of a lead that went to the wrong place. Run it through the system and watch where it goes. This lets you pinpoint the exact rule or data point that’s causing the breakdown, so you can fix it without messing with your live workflow.
Staying on top of these small checks is what keeps your automation a powerful asset instead of a source of frustration.
Common Questions About Salesforce Lead Conversion
Automating your Salesforce lead conversion is a big step, so it’s only natural to have a few questions before jumping in. We get these questions all the time from teams trying to build a much faster, more effective inbound sales process.
Let's clear up some of the most common sticking points, from what happens to old records to which tools you should actually be using. The goal here is to give you the confidence to move forward and get this done right.
What Happens to the Original Lead Record After Conversion?
Once a lead is converted in Salesforce, the original record gets flagged as "Converted." Think of it as being archived—it becomes a read-only historical file. It won’t clutter up your active lead views or reports anymore, which is great for keeping your pipeline clean.
But the data isn't deleted. You can still dig up those converted records to see the lead's original source and journey. This is pure gold for figuring out which of your marketing channels are actually bringing in your best customers over the long haul.
A word of warning: resist the temptation to "un-convert" a lead. While an admin can technically do it, it’s messy and generally a bad practice. It’s far better to nail down your qualification criteria upfront to avoid converting leads too early.
How Does Salesforce Handle Duplicate Records During Conversion?
This is probably one of the most critical questions because it directly impacts your data quality. When you kick off a Salesforce lead conversion, the system is smart enough to check for existing Accounts and Contacts that look like a match based on the company name and contact info.
If Salesforce spots a potential duplicate, it will ask the user (or the automation) what to do: merge the lead's info into the existing records or go ahead and create new ones. This built-in check is a lifesaver, but it only works well if your data is clean and standardized to begin with.
For any automated process, you have to be crystal clear in defining your matching and merging rules. If you don't, you risk your automation creating a tangled mess of duplicate accounts that will completely derail your sales team.
Can I Automate Lead Conversion Without Using Code?
Yes, you absolutely can. Salesforce has some fantastic tools that let you build powerful automations without touching a single line of Apex code. The two main players here are:
- Salesforce Flow: This is the modern workhorse for building any kind of complex, logic-driven automation in Salesforce. You can set up a record-triggered flow that fires off the lead conversion process the moment a lead meets your criteria—like when a status changes or a lead score hits a certain number.
- Process Builder: While Salesforce is nudging everyone toward Flow, Process Builder can still get the job done for lead conversion. It has a pretty straightforward "if/then" interface that's easy to grasp.
For most teams, Flow hits the sweet spot between power and usability. It's the engine that lets you connect your qualification rules directly to the conversion action, making automated Salesforce lead conversion a totally achievable project for any sharp admin.
Ready to stop losing high-intent leads to slow, manual handoffs? Distro connects directly to your demo forms to instantly route and book meetings for your sales team, turning your inbound funnel into a conversion machine. See how Distro can 3x your demo request conversions.