Converting a lead in Salesforce isn't just a status update—it's the moment a qualified prospect officially enters your sales pipeline. This is the critical handoff from marketing to sales, signaling that a lead has been properly vetted and is ready for a real sales conversation.
Getting this workflow right is absolutely fundamental. If you don't, you risk a messy pipeline and wildly inaccurate sales forecasts.
Understanding the Salesforce Lead Conversion Workflow
At its heart, converting a lead is about bringing order to your sales process. When you hit that "Convert" button, Salesforce doesn't just archive the lead. It performs a bit of magic, systematically creating a new set of interconnected records that will form the backbone of your relationship with that future customer.
Think of it like this: your marketing team has a big stack of business cards (Leads). The conversion process is like taking a promising card, creating a dedicated folder for the company (Account), a Rolodex entry for the person (Contact), and a new deal sheet to track the potential sale (Opportunity). This keeps your sales reps focused on real deals, not just a sea of unvetted names.
How Data Moves During Conversion
So, what’s actually happening behind the scenes? Salesforce intelligently takes apart the Lead record and reassembles the information into a new, structured format. This is key for data integrity and gives you a clean, complete history of the customer journey from the very first touchpoint.
- The lead's company name creates a new Account, which is the hub for the organization you're selling to.
- The person's details—name, email, phone—are used to create a new Contact record, which gets automatically linked to that Account.
- If you choose to, Salesforce spins up a new Opportunity to track the actual sales deal. This is where your reps will manage stages, deal size, and close dates.
We can break down these core components pretty simply.
Core Components of Salesforce Lead Conversion
This table lays out the essential objects involved when you convert a lead and what happens to each one.
| Salesforce Object | Role in Conversion | Key Outcome |
|---|---|---|
| Lead | The starting point; a potential prospect. | Deactivated and archived, its data is mapped to new records. |
| Account | The company or organization. | A new Account is created from the lead's company information. |
| Contact | The individual person you're selling to. | A new Contact is created from the lead's personal details. |
| Opportunity | The potential sales deal. | An optional new Opportunity is created to track the deal's progress. |
Understanding this structure is the first step to mastering your sales funnel.
By keeping leads separate from contacts and accounts, Salesforce gives marketing teams the freedom to generate and nurture prospects without cluttering up the sales team's active pipeline. The conversion is the official "green light" that tells a rep, "This one is ready to go."
This organized approach is what makes Salesforce so powerful. It ensures every promising lead has a clear home in your system, which makes follow-ups more effective and forecasting way more reliable. Once you grasp what happens during conversion, you can start to truly optimize your entire process.
Preparing Your Leads for Successful Conversion
 Let's be real: trying to convert every single lead that lands in your system is a recipe for disaster. You'll burn out your sales team and end up with skewed, unreliable pipeline data.
Before you even think about hitting that "Convert" button in Salesforce, you have to be sure the lead is actually ready for a sales conversation. A quality-first approach isn't just a nice-to-have; it's the foundation of an efficient sales machine.
This all starts with getting sales and marketing in a room to agree on what a "conversion-ready" lead actually looks like. Think of this as the bouncer for your sales pipeline. Without clear rules, your reps will waste precious time chasing prospects who were never going to buy.
Establishing Your Qualification Criteria
Your qualification checklist needs to be specific, measurable, and agreed upon by everyone. It’s the official rulebook your team uses to separate the high-potential leads from the noise.
For instance, a solid B2B qualification framework I’ve seen work wonders looks something like this:
- Company Size: Is the prospect's company in our sweet spot? For example, between 50-500 employees.
- Industry: Do they operate in a vertical where we know our solution delivers huge value?
- Job Title: Is this person a decision-maker or a key influencer? Think Director, VP, or C-suite.
- Engagement Level: Have they shown real buying intent, like requesting a demo or visiting the pricing page multiple times?
A lead should only be considered for conversion when they tick these boxes. This simple discipline ensures your team's energy is focused squarely on the deals that have the highest probability of closing.
A well-defined qualification process is your first line of defense against a bloated, inefficient pipeline. It protects your sales team's most valuable asset: their time.
Maintaining Data Integrity
Even a perfectly qualified lead can derail your process if their data is a mess. We’ve all seen it—missing phone numbers, misspelled company names, or outdated titles. This "bad data" creates friction and grinds your sales cycle to a halt.
A quick data hygiene check is an absolute must before converting any lead.
Start by using Salesforce’s built-in validation rules to enforce data completeness. A classic move is to create a rule that prevents a lead from being marked "Qualified" unless the 'Phone' and 'Email' fields are filled out.
Taking it a step further, data enrichment tools can be a game-changer. They automatically append missing company details and contact information, giving your reps the context they need to walk into that first call prepared and confident. This prep work is fundamental to a smooth and successful handoff.
How to Manually Convert a Lead in Salesforce
While automation is the name of the game for efficiency, sometimes a lead just needs that personal, strategic touch. I'm talking about those high-value prospects or complex accounts where you want to make sure every single detail is handled perfectly. This hands-on approach gives you total control over creating new Accounts, Contacts, and (most importantly) Opportunities.
Think about it. A strategic lead from a Fortune 500 company just hit your "request a demo" form. The last thing you want is for a generic automated rule to handle it. You want to personally oversee the conversion, ensure it’s assigned to your top enterprise rep, and double-check that no crucial data gets lost in the shuffle. This is exactly where the manual process shines.
First things first, you'll need to pull up the specific lead record you want to convert. Look to the top-right corner of the page, and you’ll see the Convert button. Go ahead and click it. This opens up the lead conversion interface, which is basically your command center for this whole operation.
Navigating the Conversion Interface
Right off the bat, Salesforce does something incredibly helpful: it checks for duplicates. It’ll automatically search for existing Accounts and Contacts that match the lead's information. This is a critical step to prevent creating a messy, cluttered database full of duplicate records. You'll get a prompt to either create brand-new records or merge the lead's info into existing ones.
Always—and I mean always—take a moment to review the duplicate check results. Merging into an existing Account is almost always the better move. It keeps your customer data clean, consolidated, and accurate.
Once you’ve sorted out any potential duplicates, you'll see the options to create the new records. The screen below gives you a sense of what this dashboard looks like, though it’s showing the end result: better conversion rates.
This is where you make a few key decisions:
- Account: A new Account will be created using the lead's Company name. Simple enough.
- Contact: A new Contact is made from the lead's name and contact details. Again, pretty straightforward.
- Opportunity: Now, this one is optional. You can choose to create a new Opportunity right away and give it a name. Or, if the lead isn't quite ready for an active sales cycle, you can check the "Don't create an opportunity upon conversion" box.
After you've configured these settings and hit that final Convert button, Salesforce works its magic. The system will then take you straight to the newly created Contact record, complete with links to the associated Account and Opportunity. It’s now officially teed up and ready for your sales team to engage.
Automating Lead Conversion with Salesforce Flow
While manually converting leads gives you pinpoint precision, it just doesn't scale. If you want to grow your sales operation without hiring an army of reps, automation is your best friend. This is where Salesforce Flow comes in, letting you build powerful, automated workflows that convert leads consistently and lightning-fast every single time. It's all about taking that manual busywork off your team's plate so they can do what they do best: sell.
Think about it. A hot lead fills out your demo request form and gets a high lead score. Instead of that lead sitting in a queue waiting for a rep to notice, a flow can kick off the conversion process instantly. That speed is absolutely critical. Studies show that getting back to a lead within just five minutes can skyrocket your chances of actually qualifying them.
This infographic gives you a bird's-eye view of how leads typically move through a sales funnel.
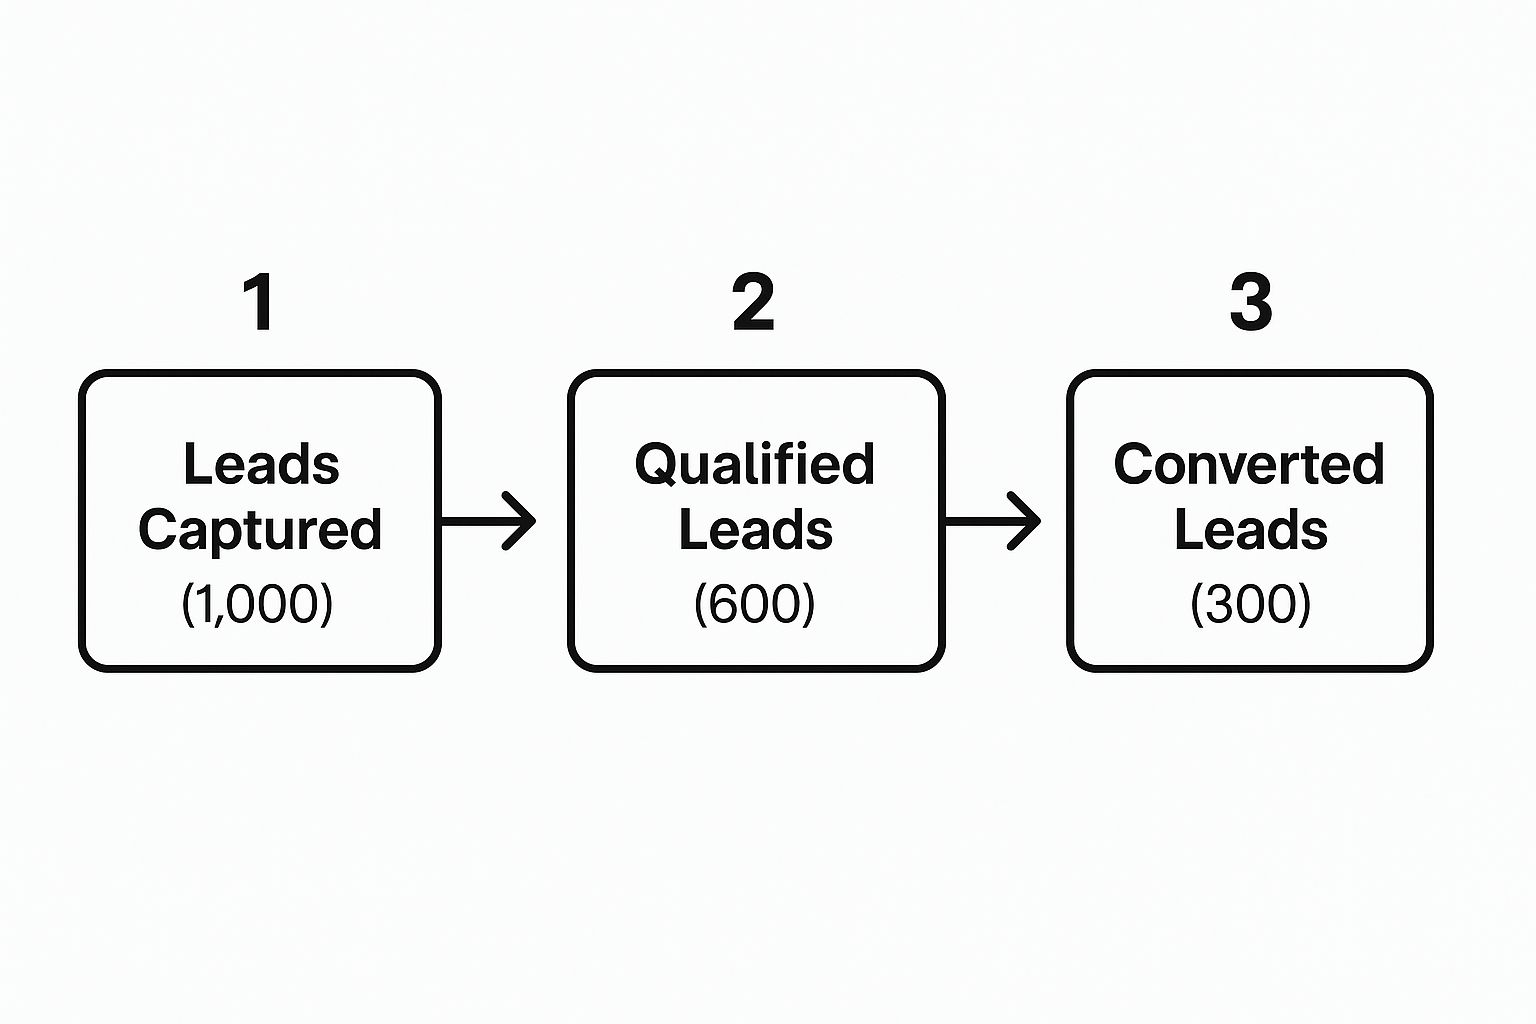
By automating that crucial step between "qualified" and "converted," you're basically hitting the fast-forward button on your entire funnel. You can turn those high-potential prospects into real, actionable opportunities in seconds, not hours or days.
Building Your Conversion Flow
When you're putting your flow together in Salesforce, everything starts with the trigger. What event is going to kick this whole process off? You'll want to launch the conversion based on a specific field update that signals a lead is ready.
Here are a couple of common triggers I've seen work well:
- Lead Status: The most straightforward trigger. When a rep changes a lead's status to "Qualified," the flow fires.
- Lead Score: This one is a bit more sophisticated. Once a lead's score blows past a certain number (say, >80), the flow automatically converts them. If you want to get smarter about this, check out these lead scoring best practices.
Once your flow is triggered, the real work begins. You have to be meticulous about mapping all your important custom fields from the Lead object over to the new Account, Contact, and Opportunity records. This is a common tripwire; any custom fields you forget to map will mean lost data. Gone. Poof.
Always, and I mean always, build in some error handling. A classic mistake is a flow failing because a required field on the Account object is empty.
Pro-Tip: Set up a "fault path" in your Salesforce Flow. If a lead conversion fails for any reason, this path can shoot an automated email to your system admin with the error message and the Lead ID. This makes troubleshooting a breeze instead of a nightmare.
This kind of automation does more than just boost your speed-to-lead. It also ensures your qualification rules are applied the same way, every time, across your whole team. Many of these ideas are foundational to broader small business marketing automation strategies, which are all about nurturing and converting leads as efficiently as possible.
Boosting Conversion Rates With Lead Scoring and Routing
 Just converting leads isn't the real game. The goal is to convert the right leads at the perfect moment. This is where you graduate from just doing the work to strategically crushing your numbers, making sure your sales team’s energy goes where it counts.
The secret weapon here? A solid lead scoring model.
Lead scoring is all about assigning points to leads based on who they are and what they do—think job titles, company size, or how they've interacted with your site. It creates a pecking order, so your reps can instantly see which prospects are waving a big "I'm ready to buy" flag. But remember, lead quality starts way before they ever hit Salesforce. It all begins with your marketing. Nailing your effective audience targeting in your marketing campaigns is the first step to filling your pipeline with prospects who are actually a good fit.
Prioritize With Intelligent Scoring
You can get your hands dirty building custom scoring models from scratch, or you can let Salesforce’s AI do the heavy lifting. Einstein Lead Scoring, for instance, digs into your historical data to predict who's most likely to convert, taking all the guesswork out of the equation.
And this isn't just a "nice-to-have." Research shows that companies using smart lead scoring can see their ROI from conversion efforts jump by as much as 70%.
A high lead score is your system screaming, "Talk to this person now!" It’s a direct signal telling you where your team's most precious resource—their time—will make the biggest impact.
Once you’ve got your leads prioritized, you need to get them to the right rep, instantly. This is where intelligent lead routing comes in. Instead of a chaotic, first-come-first-served free-for-all, you set up smart rules that do the work for you.
- Territory: Automatically send leads from the West Coast to your rep in California.
- Company Size: Funnel those enterprise-level leads straight to your senior account executives.
- Product Interest: Route leads based on the specific product page they were just looking at.
This one-two punch of scoring and routing creates an incredibly efficient conversion machine inside Salesforce. Your hottest leads get immediate attention from the perfect rep, which can dramatically slash your sales cycle. To get this right, you'll want to dig into these essential lead routing best practices.
Common Questions About Salesforce Lead Conversion
Diving into Salesforce lead conversion can feel like learning a new language. Some of the processes aren't exactly intuitive, and one wrong click can create a data nightmare you'll be untangling for weeks. Let's walk through some of the most common questions that come up.
A big one, especially for teams new to the platform, is what actually happens to the original lead record once it's converted. It’s a great question, because Salesforce doesn’t just hit the delete button.
When a lead is converted, the original record is essentially archived. It becomes read-only and gets tucked away, hidden from standard lead reports and searches. All of its standard field data—think name, email, company—is automatically moved over to the shiny new Account, Contact, and (if you create one) Opportunity records.
What Happens to Custom Lead Fields?
This is where things get tricky, and it’s a classic tripwire for many teams. While standard fields map over without any drama, your custom lead fields will not. Not unless you specifically tell them where to go.
You have to manually map every single custom lead field to a matching custom field on your Account, Contact, or Opportunity. If you skip this step, all that valuable custom data you collected vanishes into the ether during the conversion. This is a critical one-time setup task you can't afford to overlook.
Another frequent point of confusion is whether you can undo a conversion mistake.
The short answer is no. Salesforce was not built with an "un-convert" button. The process is a permanent, one-way street by design.
If a lead gets converted by accident, your only real option is to manually delete the new Account, Contact, and Opportunity records. From there, you'd have to recreate the lead from scratch. A few third-party AppExchange tools claim to offer this functionality, but it’s not a native Salesforce feature.
How Salesforce Prevents Duplicates
Salesforce has a pretty smart built-in guardrail to stop you from muddying your database with duplicates during conversion. As you convert a lead, the system automatically scans your existing Accounts and Contacts for records that match the lead's company and contact name.
It then presents you with any potential matches and gives you a couple of choices:
- Merge: You can combine the lead's information into an existing record.
- Create New: If you're certain it's not a duplicate, you can go ahead and create a brand new, separate record.
For even more robust protection, you can set up Duplicate Rules in your Salesforce org. This lets you enforce your company's specific data standards and is a huge help in keeping your CRM clean and reliable. Ultimately, a clean database and an efficient process are key to improving your overall sales conversion rate.
Finally, what if you don't need to create an Opportunity every single time? During the manual conversion process, Salesforce gives you an easy out. Just look for the checkbox labeled "Don't create an opportunity upon conversion." This lets you create the Account and Contact without cluttering your pipeline with deals that aren't quite ready for primetime.
Ready to stop letting hot leads go cold? Distro automatically routes high-intent prospects to the right sales rep’s calendar the second they request a demo. See how intelligent scheduling can 3X your form conversion rates at https://distro.so.